I vividly remember my first introduction to crystalline glazes. I was in my second ceramics class of my undergraduate education, thumbing through the user’s manual for the school’s old Skutt 1027 electric kiln and noticed a section in the back with firing schedules. There was a schedule for something called a crystalline glaze, my attention was immediately sparked. At that time (2001) this ceramics program had a very traditionally southern-based aesthetic. We did a lot of salt firings (which I liked to refer to as brown, brown, and light brown), temmoku was the hottest glaze in the studio, and everything revolved around function. I was the odd man out and when I read the words “crystalline glaze,” it seemed the farthest possible thing in existence from the color brown. I wanted bright color. I wanted pizazz. I had spent most of my time as a kid in Philadelphia, Pennsylvania, writing graffiti, going to punk rock shows, and apprenticing to be a tattoo artist. I really felt at home at the potter’s wheel because it was the first time in my life that I found myself sitting, quiet, focused, and completely entranced, but that didn’t mean I had to like brown, brown, and light brown. Crystalline glaze was going to be awesome!
It took me almost an entire school year to get my first successful results. I’ll never forget opening the first kiln where my firing actually produced crystals; there was one pot, with this big beautiful sparkle shining up at me. Then, under that pot, was a huge puddle of glaze covering about half the shelf. I learned very quickly that I needed to get the rules down before I kept moving ahead. Almost 15 years later, I haven’t ruined a kiln shelf in almost a decade.
Now for a disclaimer before we get down to business. There are no magic tricks in crystalline glazing, and there are no secret recipes. There is just hard work, paying attention, and making lots of adjustments. Imagination doesn’t hurt either. There are too many techniques and variables in crystalline glazing to fully talk about them all in anything outside of a book. This is just my journey with crystalline glazes; I highly suggest researching before you dive in head first.
Appropriate Forms
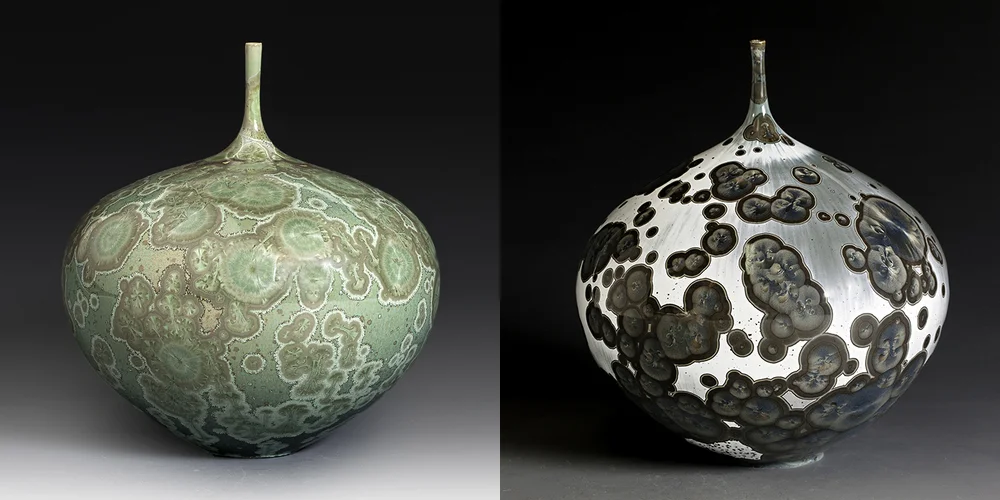
You may have noticed that there is a relative similarity in shapes with a lot of potters using crystalline glazes. Round, smooth forms dominate the scene, and that’s for good reason. The typical crystalline glazes flow when hot, they move with gravity down the pots, flat spaces pool up, and sharp edges tend to get too thin. (Crystalline glazes are a basic mixture of zinc, silica, and frit as a flux to help them melt. As the glaze gets hot the zinc and the silica combine to form small points, or seeds of zinc silicate. These seeds are what grow to be the crystal during the rest of the firing process.) Accent points with texture are rarely reliable because the glaze covers everything, and the crystals mostly grow where they want. This means they will also grow where you don’t want them to. When I first started making crystalline glazes my pots were absolutely atrocious. I was so focused on the glaze that I almost completely ignored the aesthetics of the forms. My professor quickly pulled me aside and talked about my choices of form and challenged me to do better. At first I rebelled, making my forms looser and messier, but it just ended up making the end product worse.
With my crystalline work, I want pots that swell from narrow feet to a wide waist back to a narrow top. I prefer porcelain because it’s a perfect backdrop for my glaze, although there are a few white stoneware clays out there that will work just fine. There is always an option of throwing stoneware and using a porcelain engobe as well.
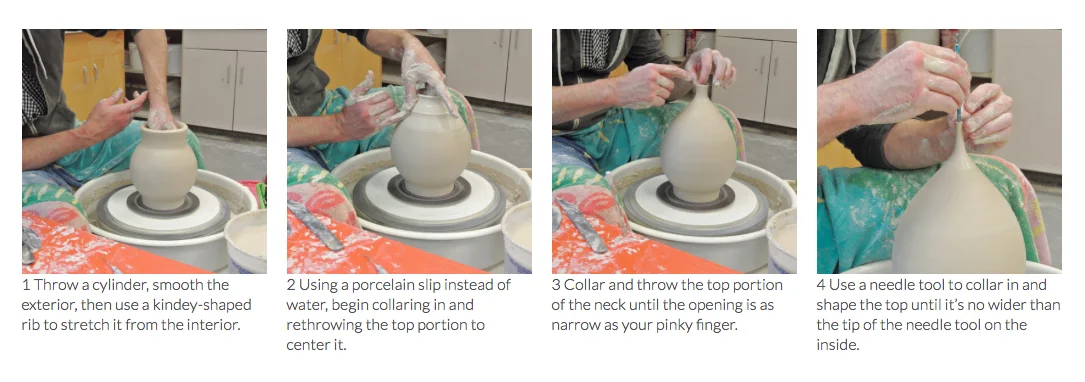
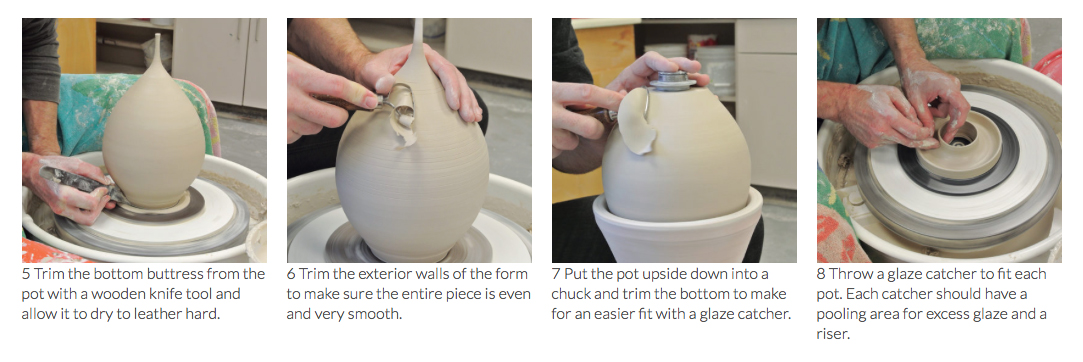
I throw all my pieces from a standard cylinder (1), and then stretch the form with ribs from the inside (2). Next, I collar in the top until the tiniest opening remains (3, 4). Once the pot is thrown and the bottom is cleaned up (5), it’s left to dry to leather hard, then the entire piece is trimmed (6, 7). I don’t just trim the foot, I trim the entire surface of the pot. My glazes can be as reflective as a mirror, any delineation on the curve of the form or marks in the surface will show up and be amplified by the shininess of the surface. Trimming the entire surface allows me to really dial in the smoothness of the pot.
Glaze Catchers
Next, a glaze catcher needs to be made. The catcher prevents the runny glaze from ruining your pot and your kilns shelves. A basic glaze catcher is nothing more than a small riser in a dish that elevates the pot off of the kiln shelf so the glaze has a place to run into (8). Each piece gets its own glaze catcher that will be discarded after the firing. Glaze catchers can be thrown or extruded. I prefer throwing them; I can make a much thinner wall that tends to aid in its release after the pot has been fired. It’s important that the catcher’s riser fit the foot of the piece very tightly so that no glaze can fit between the top of the riser and the bottom of the pot.
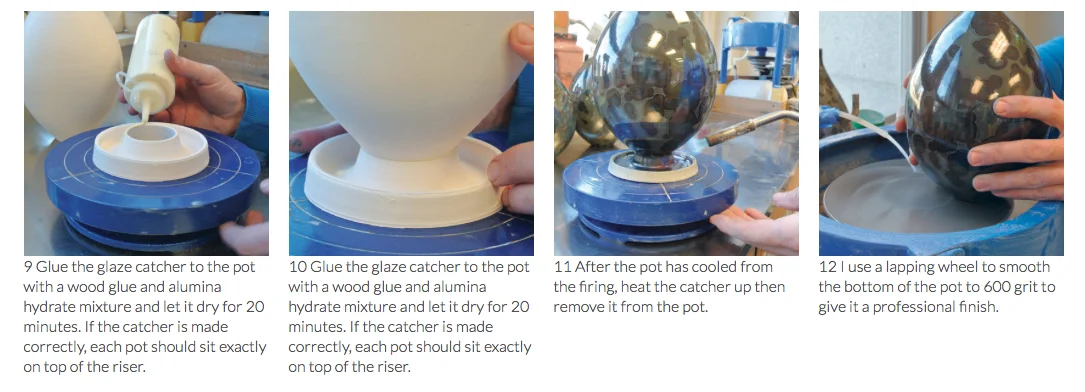
The catchers and the pots are glued together, after each are bisque fired, with a mixture of wood glue and alumina hydrate (9, 10). Mix the glue with the alumina until it starts to thicken and won’t run down the riser when gluing, but not too thick that it won’t absorb into the clay a bit. The wood glue only serves to bind the pieces together for the purposes of glazing and loading. During the firing the wood glue burns away leaving a small gasket of alumina hydrate that helps separate the catcher from the pot.
Glazing
There are tons of ways to mix, store, and apply crystalline glaze, most of them work fine, but everyone will argue with you as to which is the best. The reality is that, the best way is the way that you feel most comfortable with.
I use a series of glaze bases, each one getting mixed before I add metal oxides and carbonates to create the color fields that I desire. I mix up small batches of each color at a time so that it’s easier for me to make adjustments more often since clay and glaze materials change over time. Crystalline glazes are extremely sensitive to small changes. If my supplier tries a new feldspar in the clay I use, or my batch of zinc comes from a new mine, my entire glaze can change and will need adjusting. One little change and my pots can either be completely saturated with crystals, or totally void of them.
Typically crystalline glazes are applied fairly thick, with the thickest application at the top of each piece and the thinnest near the foot. Most of my glazes run about 1–2 inches down the surface of the pot. I try to plan my application so that everything ends up even after the firing. This takes some practice, and I’ll be the first to admit I still occasionally get it wrong. The thickness of the fired glaze can affect the number and size of crystals grown, and can also change the color a bit. I use a spray gun to apply my glazes, mostly because it’s the fastest method. I spent years brushing, and loved the control I got, but loathed spending hours glazing a kiln load.
I measure the specific gravity of my glazes, and then do a rough guess of the volume of each piece. I use this to measure out how much glaze I want to spray onto each pot. This way I don’t have extra glaze left in my gun to get carried away with, or if I have a gun half full of glaze after spraying a pot, I know I got timid and still need to use the rest of the glaze to get the desired thickness. This isn’t the most accurate method in the world, but it works very well for me.
Glaze Firing
The firing process is the fun part, but can wreak havoc on kiln elements. The kiln I use for glaze firings is an electric kiln with 2-inch thick soft brick walls. I fire my pots to cone 10 with a 10 minute hold at top temperature. Most electric kilns really hate firing to cone 10, let alone a hold at top temperature. I program my kiln with a typical fast firing to cone 10, and then add the hold. From there I have a couple of different programs that I use to soak the pots and allow the crystals to grow to the size and shape I’m looking for. Here is a typical firing schedule:
- Fast fire to cone 10, hold for 10 minutes.
- 9999°F p/h to 1950°F for 30 minutes (this just means let the kiln cool at its natural rate to 1950°F).
- 100°F p/h to 2050°F for 90 minutes.
- Allow the kiln to cool naturally from here.
Removing the Catcher
Once the pots are cool to the touch and out of the kiln, the scary part needs to happen. I place the pot on a banding wheel and while spinning it slowly, I use a blowtorch to heat up the riser right below the joint of the riser and the pot (11). The heat causes the riser to expand separately from the pot and forces the pot to break free. If the seal was nice and tight it should come off very easily, but sometimes a small tap with a finishing hammer is needed.
Once the catcher is removed, the bottom needs to be smoothed. I use a homemade lapping wheel now, but for years I used a bench grinder and a Dremel tool. The lapping wheel really gets the bottoms clean and smooth.
Refire and Adjust
Whenever I’m not happy with the crystalline glaze results on a specific piece, I leave the catcher on and I refire it. Since crystalline glazes require fusing of the zinc with the other materials to make crystal nucleation points, I often apply a very thin layer of glaze over a warm pot to reintroduce some zinc and silica back into the mix.
Troubleshooting
- Too many crystals: try lowering the zinc content a few grams, or increase the silica a bit. Or you can add a small hold at the top temperature so the crystal grow points will dissolve.
- Too few crystals: try increasing the zinc or decreasing the silica. Make sure your kiln is reaching top temperature within eight hours. Again, the glaze seed points dissolve at top temperature, if you fire too slow they will all melt away.
Magic
Okay, I lied earlier when I said there is no magic. In fact, there is one magic trick. Well, not magic, but chemistry. It sure feels like magic though.
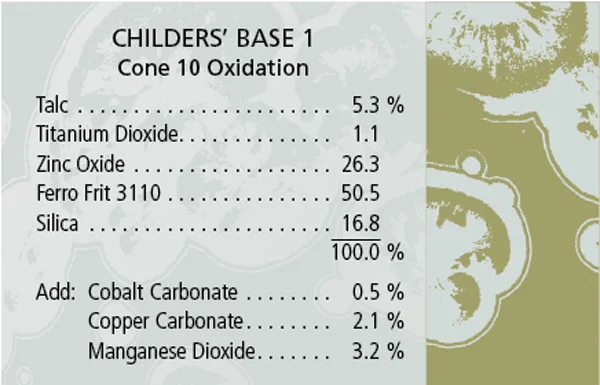
Childers recipe
When a pot is finished and the glaze is just about perfect, but you’ve added too much copper or too much manganese and the surface is too dark, or the crystals don’t stand out from the ground enough, the entire pot can be submerged in acid to lighten it up a bit. I stumbled onto this technique when I first started making crystalline pots by spilling a popular sports drink into a box that had a pot in it. I didn’t notice for several hours as the wet box held the liquid against the pot and changed its surface forever. I had no idea what happened and decided to just submerge the entire pot into the sports drink overnight and see if I could get it to even out. It worked like a charm.
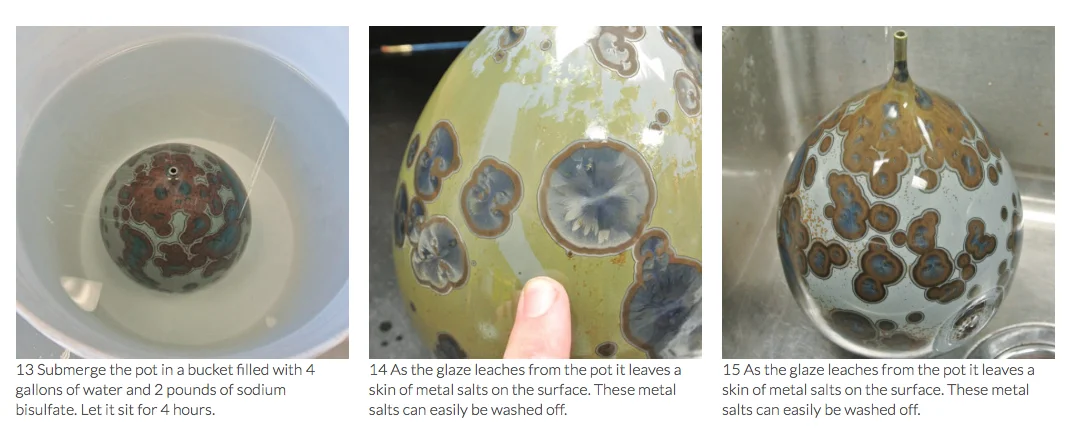
I spent years with five gallons of blue POWERADE® in tubs in my studio. After some time, I reached out to a friend who was much smarter than I am, who did lots of scientific testing to help me track down the best acid for etching my pots. The two best ones I’ve used are plain old white vinegar in a bucket for 24 hours, or sodium bisulfate (otherwise known as PH Down for swimming pools) mixed with water in a bucket for four hours (13). This is very similar to the way potters used to soak Oribe ware in vinegar to tone their surfaces down a bit.
Both of these materials are generally safe to use and easy to get. They both work just the same at different rates of time. There are more aggressive acids out there, but I haven’t found any of them that worked any better than vinegar or sodium bisulfate. Caution: Once a pot is soaked and the surface has changed, the change is permanent unless you’re willing to refire it.
After the pot has soaked in the acid, it’s removed and a noticeable layer of metal salts remains on the surface (14). These salts are easily washed away under clean water (15).
Final Thoughts
I’ve been working with these glazes for almost 15 years. They have been with me through undergraduate school, graduate school, and now my teaching career. They’ve tested my patience, wrecked my kiln elements, run all over my shelves, and they continue to challenge me to this day.
They forced me to slow down, keep good records, pay attention to details, and occasionally feel like a mad scientist. I still open the kiln way to early just to get a peek inside and see the magic.
Ian Childers is a professor of ceramics at Mississippi University for Women in Columbus, Mississippi. He’s been working with crystalline glazes for 15 years. To see more of his work check out www.ianchilders.com or Instagram: @ianchilders.