Etched in Clay
How to Make Beautiful Relief Surfaces with Shellac Resist
Cortesy of: www.ceramicartsdaily.org/
Not long into his ceramics career, Jim Gottuso became enamored with the idea of using wax resist for surface decoration. The only problem was the wax resist didn't do well with delicate decoration or thin brushwork. On both greenware and bisqueware, the wax just became a goopy mess.
So Jim experimented and explored, all the while building his own aesthetic, and discovered the resist medium that could give him what he wanted: shellac. Today, Jim explains how he uses shellac resist and hydro-abrasion to create his intricately patterned surfaces. - Jennifer Harnetty, editor.
About five years ago, I decided to embark on a ceramics career and before long developed an interest in trying to exploit the use of wax resist in the service of surface decoration. I was disappointed with the waxes I tried on both bisqueware and greenware. They were globs of goo that didn’t respond to thin brushes or delicate application.
At the same time I happened upon the work of Arne Ase whose work absolutely floored me, especially after unsuccessfully trying wax, paraffin, and acrylic medium on greenware in an attempt to etch the unprotected areas and create depth to the surface. His decorations were incredibly delicate and, of course, his use of soluble salts and translucent porcelain came together in pieces of sublime beauty. What wasn’t clear was what he used for a resist. It turns out that Arne had written Water Colour On Porcelain, which has been described as the definitive book on soluble salt use and the secret ingredient had to be in that book. Unfortunately it is out of print, but the library managed to find a copy, and the book revealed the ingredient as shellac.
I’ve since been told by fellow blogger, Michael Kline, that at Penland the process of using a resist and dissolving the exposed unfired clay was referred to as hydro-abrasion. This sounds a bit scientific to me but in the absence of a concise alternative it might very well be the best name for it.
After a couple of years of hydro-abrasion trial-and-error as well as nurturing the evolution of a personal visual vocabulary, it turns out that this process dovetails very nicely with what appeals to my sense of design, form, and aesthetics. For many years I’ve been attracted to certain drawing, painting, and calligraphic styles, and usually cite artists like Cy Twombly and Mark Tobey as influences, along with my perception of Jung’s automatic writing. But after many years of not really caring about the origins of influence, I’ve come to believe that I’ve always just been in love with what happens when a brush, pen or pencil makes contact with another surface. Using shellac as a resist on dried, unfired clay allows the surface to be etched without losing the immediacy and spontaneity of such brushwork.
Thinking in Reverse
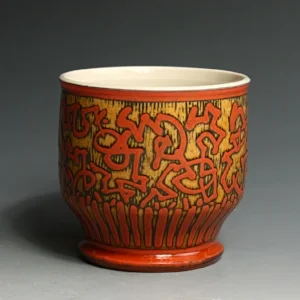
Begin with a bone dry, completely trimmed piece, in this case a bowl. Since my pieces are typically about 1/4-inch thick, tapering to 3/16-inch at the rim, I take extra care not to put a strain on it. This process requires a bit of thinking in reverse. Protect the parts of the piece that are not to be altered. The first layer of shellac resist applied to the piece, because it covers the clay before any abrasion takes place, end up being the topmost layer, or highest relief area at the end of the process. Since I don’t want the rim or foot to be etched, I apply resist to both to preserve their integrity throughout the process.
Defining the Foreground
The next step is to apply the first layer of resist that will create the decoration and will result in the top or foreground layer of the final design. One way to think about this would be to imagine writing your name with the shellac then etching the un-shellacked areas. If, after that another layer of shellac was applied in a grid pattern over the name and etched again, the result would appear as your name hovering over the grid, even though the applications were done in reverse. Although this seems counter-intuitive, it becomes clear with repetition. For the finished piece shown here, the first layer is a series of vertical calligraphic marks that go from the foot to the rim.
Abrading the Clay
After allowing the shellac to dry completely (24 hours will do), you’re ready to abrade the exposed areas with a damp sponge. If you intend to preserve what’s been laid down in shellac without degradation, you might want to jettison the idea of abrasion, think of the your goal in the process as more like dissolving the clay, even though that’s not technically what’s happening.
The abrasion occurs when the water between the sponge and the surface of the pot collects dislodged clay particles in it and creates a localized slurry, which will get thicker and thicker as you go. Leaving this thick slurry between the sponge and the pot is not good for your shellac image. When the sponge has lots of clay on the surface and little water left in it, you’re likely to simply eradicate your image along with the unprotected areas as the large particles on the sponge repeatedly move across and scratch into the surface.
To avoid this, load a sponge with water and wipe the surface of the pot until the slurry starts to form, then rinse the sponge thoroughly in your bucket of water and repeat. In this early stage, with large unprotected areas of clay, this means you’re having to rinse out the sponge frequently, sometimes after only two swipes across the clay.
Defining the Middle Ground
After allowing the piece to completely dry again apply a second layer of shellac. I’m trying to create the appearance on the final bowl of a thin brush stroke that’s hovering or sitting on top of another, slightly wider, brush stroke. I apply shellac over the top of the original shellac lines and make this second layer extend about 1/8 inch past the edge of that first layer.
Adding Linear Elements
On this particular bowl, my goal is to have a linear reinforcement of the negative space that’s created by the slightly widening brushwork. To achieve this, shellac is also applied in all the remaining unprotected areas, leaving only a small (1/8–3/16 inch) gap of bare clay between the two covered areas.
Allow the piece to dry again and repeat the etching process (figure 6). Since more (or even most) of the surface is covered by shellac at this point, you don’t have to thoroughly rinse the sponge out quite as frequently. When you notice a slurry developing, rinse the sponge to avoid abrading the edges of the resisted areas, otherwise your lines may have jagged rather than crisp edges. Since the area being dissolved now is linear as opposed to large planes, moving in a circular motion with the sponge aids in getting a uniform depth to the etching. It can be particularly difficult to gauge how deep the etching is now because the layers of shellac have some thickness or depth themselves. The shellac will eventually burn out in the bisque and only then is the depth and uniformity of the etching revealed.
Adding Color
Let the piece dry completely then brush a black slip suitable for use on greenware over the entire exterior of the bowl. My black slip is made from throwing slip reclaim and 35 grams of Mason stain #6600 black added per 2 cups of slip.
With a sponge, wipe off any slip that is not in between the etched lines before it dries. Remember that if you accidentally take too much slip off and there are unprotected areas that are now back to bare clay, it’s relatively easy to reapply more slip immediately to that area and try again allow it to dry, then bisque fire.

Glazing Strategies
When the bowl is bisque fired, you’ll finally be able to see how the decoration looks, from the subtleties of the etched layers to the contrast between the dark and light tones of the slipped and bare areas. At this point, a flaky residue may be present everywhere the shellac was applied, depending on the thickness of the shellac layers. This wreaks havoc with glaze application, so brushing the entire surface with a stiff brush is necessary to clean it up.
When glazing, I dip my pots but spraying, pouring and painting the glaze also works. Of course, in order to accentuate the subtle differences in relief, transparent or translucent glazes, or glazes that break over texture and edges, works the best. If the colored slip is dark (like this black one), a darker glaze cuts way down on the contrast. Note: Since the relief is low, a thin glaze application works better since a thicker glaze on the finished piece will soften the etched effect.
- Materials
- Shellac
- Denatured alcohol
- Brush
- Sponge
- Water
- OSHA approved respirator
Shellac thickens when exposed to air and will lose its ability to soak into the clay body thoroughly. It can be thinned with alcohol but over time it will lose its viscosity and will eventually need to be discarded. Avoid the waste by decanting only what you need into a small lidded jar for application.